Bricks |
  
|
Bricks |
|
Create > Bricks allows you to draw new bricks in the model. To draw a brick, simply move the mouse and click the left mouse button from point to point.
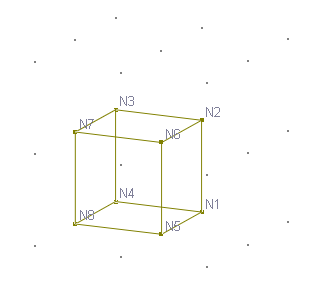
The grid must be set up in 3 dimensions. The clicked points must be intersections on the grid or existing nodes. These points become the element nodes. New nodes are created if necessary. Remember, the order of clicked points must be such that the vector of the surface 1-2-3-4 points to the surface 5-6-7-8. The bricks drawn have the current material properties. You may use the commands in the Create or Modify ribbons to assign appropriate properties to them.
You may also specify a node by entering nodal X, Y, and Z coordinates in the command window via the keyboard. This is very useful if you need to specify nodes outside the grid interactions. In addition, you may specify a node by entering an existing node number directly. You can combine the use of keyboard and mouse to draw bricks.
You may turn on annotations for nodes and bricks while drawing. To do that, use the Display Options buttons on the Quick Access Toolbar. The command remains in effect until another command is selected, the right mouse button is clicked, or ESC is pressed.
It is generally not easy to draw bricks in 3 dimensions due to visualization difficulty. You may generate bricks based on shells using the commands such as Modify > Extrude or Revolve. You may also use spreadsheets to input nodes and bricks by running Tables > Nodes or Bricks.
 <
<