Project Load Group Builder |
  
|
Project Load Group Builder |
|
The Project Load Group Builder enables the user to store commonly used "Load Items" and then combine them into various Groups to calculate total loads for the defined Groups.
Load Items are defined and organized on the right-hand side of the screen as indicated in the screen capture below:
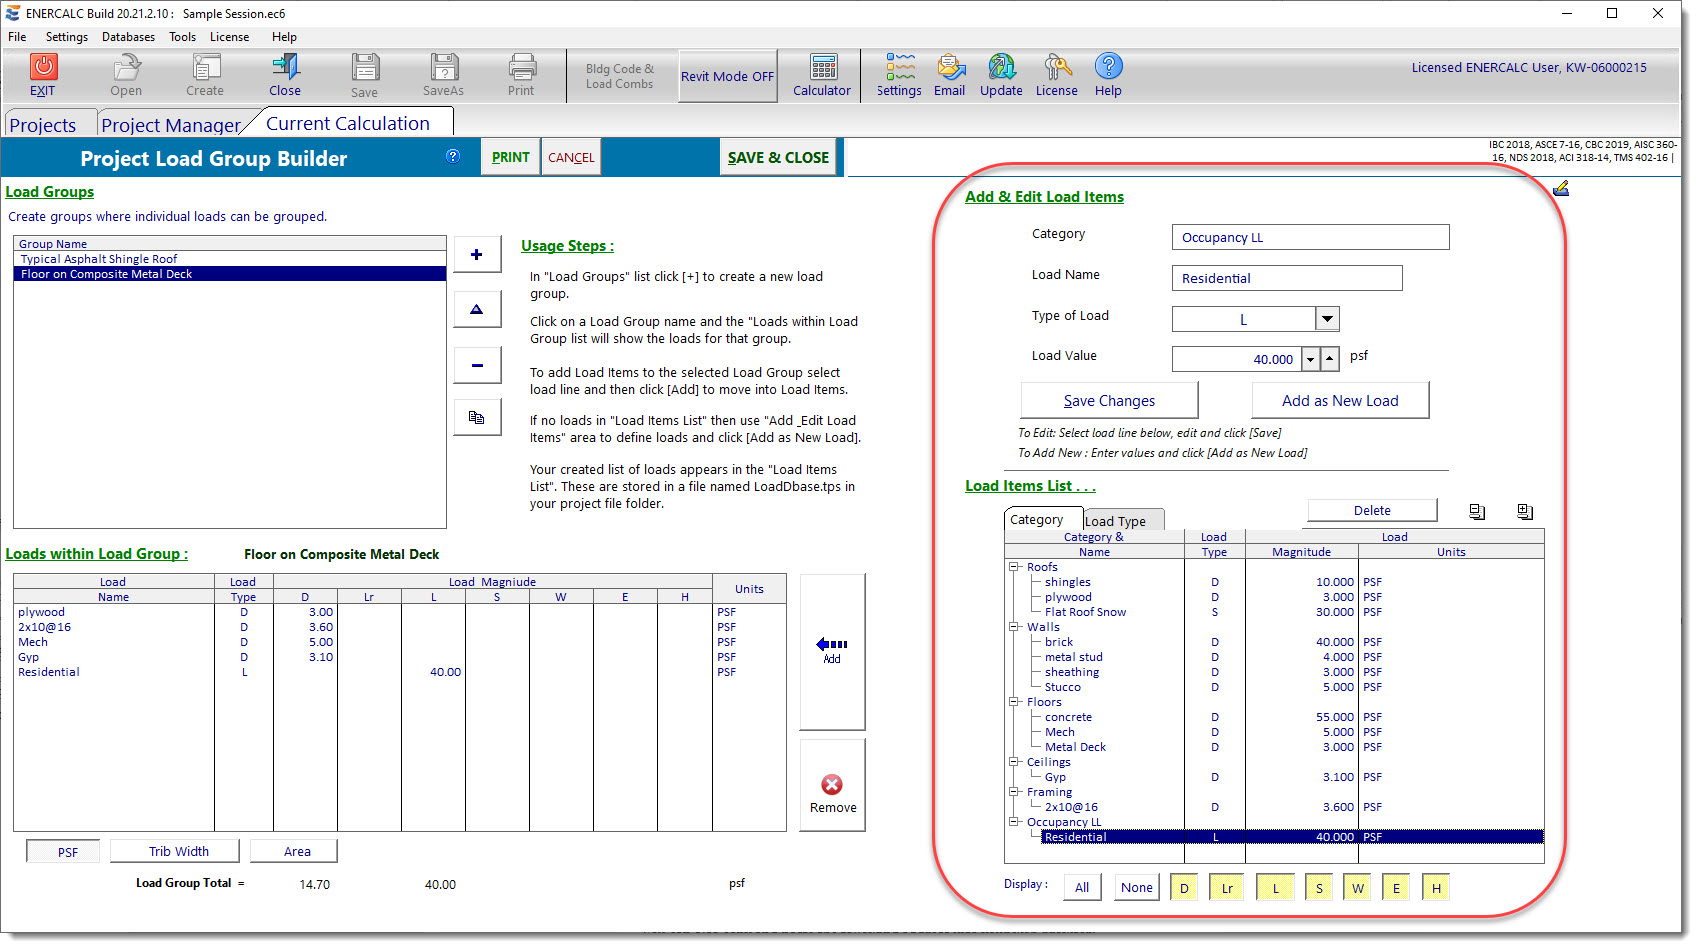
You can type in a Category name (discussed in more detail below), a Load Name, choose the Load Type, and specify the Load Value, and then click "Add as New Load". The newly added Load Item will appear in the Load Items List below. To edit an existing Load Item, click on the item of interest in the Load Items List, edit the values in the individual fields above, and then click "Save Changes"
Load Items are very flexible in their definition. A Load Item could represent the weight of a particular building construction material, such as the Dead Load of 3/4" plywood floor sheathing in units of PSF. A Load Item could also represent an allowance of 5 PSF Dead Load for ceiling & lights. But Load Items can also take the form of load types other than Dead Load as well. For instance, you could define a Load Item consisting of 100 PSF Live Load, or 30 PSF Snow Load. In this way, the Project Load Group Builder is capable of tracking loads of all types that may be applicable to a particular area of a building.
One of the powerful features of the Project Load Group Builder is that it takes the Load Item data that you enter and it saves that data in a file that is separate and distinct from your Project File. (The file is named LoadDbase.tps, and it is saved in the folder that you have identified as your default Project File location.) In this way, the system continues to accumulate more and more of your commonly specified materials and loads as you work on different projects. And that ever-growing database of your custom Load Items is always available to you on future projects.
In order to bring some organization to the many load items that you may eventually accumulate, the Project Load Group Builder introduces the concept of the "Category". A Category can contain one or more Load Items. Here again, the way you use Categories can be extremely flexible. Some users may prefer to organize their Load Items into Categories that represent different types of materials or loads. For example, the organizational hierarchy might take on a form like this where the bullet items represent Load Items within the indicated Category:
Category: Roof Sheathing
•1/2" sheathing
•5/8" sheathing
•3/4" sheathing
•7/8" sheathing
•1" sheathing
Category: Roof Framing
•2x6@16" o/c
•2x8@16" o/c
•2x10@16" o/c
•2x12@16" o/c
Category: NW Concrete Slab
•4.5" total with 2" deck
•5.0" total with 2" deck
•5.5" total with 2" deck
•6.0" total with 2" deck
•5.5" total with 3" deck
•6.0" total with 3" deck
•6.5" total with 3" deck
Category: LW Concrete Slab
•4.5" total with 2" deck
•5.0" total with 2" deck
•5.25" total with 2" deck
•5.5" total with 2" deck
•6.0" total with 2" deck
•5.5" total with 3" deck
•6.0" total with 3" deck
•6.25" total with 3" deck
•6.5" total with 3" deck
Category: Live Load
•Classroom
•First Floor Corridor
•Office
•Stack Rooms
Category: Snow Load
•30 PSF
•32 PSF
•34 PSF
•36 PSF
And so on...
But remember, this is just one way that Categories could be used. Here is yet another idea:
Category: Typical classroom on structural floor
•DL of flooring
•DL of concrete slab on metal deck
•DL of composite metal deck
•DL allowance for structural steel framing
•DL allowance for ceiling & lights
•DL allowance for mechanical & misc.
•LL for classroom occupancy
•LL for partition allowance
Category: Typical corridor on structural floor
•DL of flooring
•DL of concrete slab on metal deck
•DL of composite metal deck
•DL allowance for structural steel framing
•DL allowance for ceiling & lights
•DL allowance for mechanical & misc.
•LL for corridor above first floor occupancy
Category: Typical roof structure
•DL of asphalt shingles
•DL allowance for second layer of asphalt shingles
•DL of metal roof deck
•DL structural steel framing
•DL allowance for ceiling & lights
•DL allowance for mechanical & misc.
•SL for sloped roof
And so on...
So remember that your Load Items and your Categories are being stored in a separate file, and they are continuing to accumulate from one project to the next as you enter more data. Consider this as you decide on a system of organization that will work best for you.
Now that we have covered Load Items and Categories, we can introduce the real purpose for this module, which is the "Load Group". Very simply, a Load Group is a group of Load Items that will be summed together.
Load Groups are defined and manipulated on the right-hand side of the screen as indicated in the screen capture below:
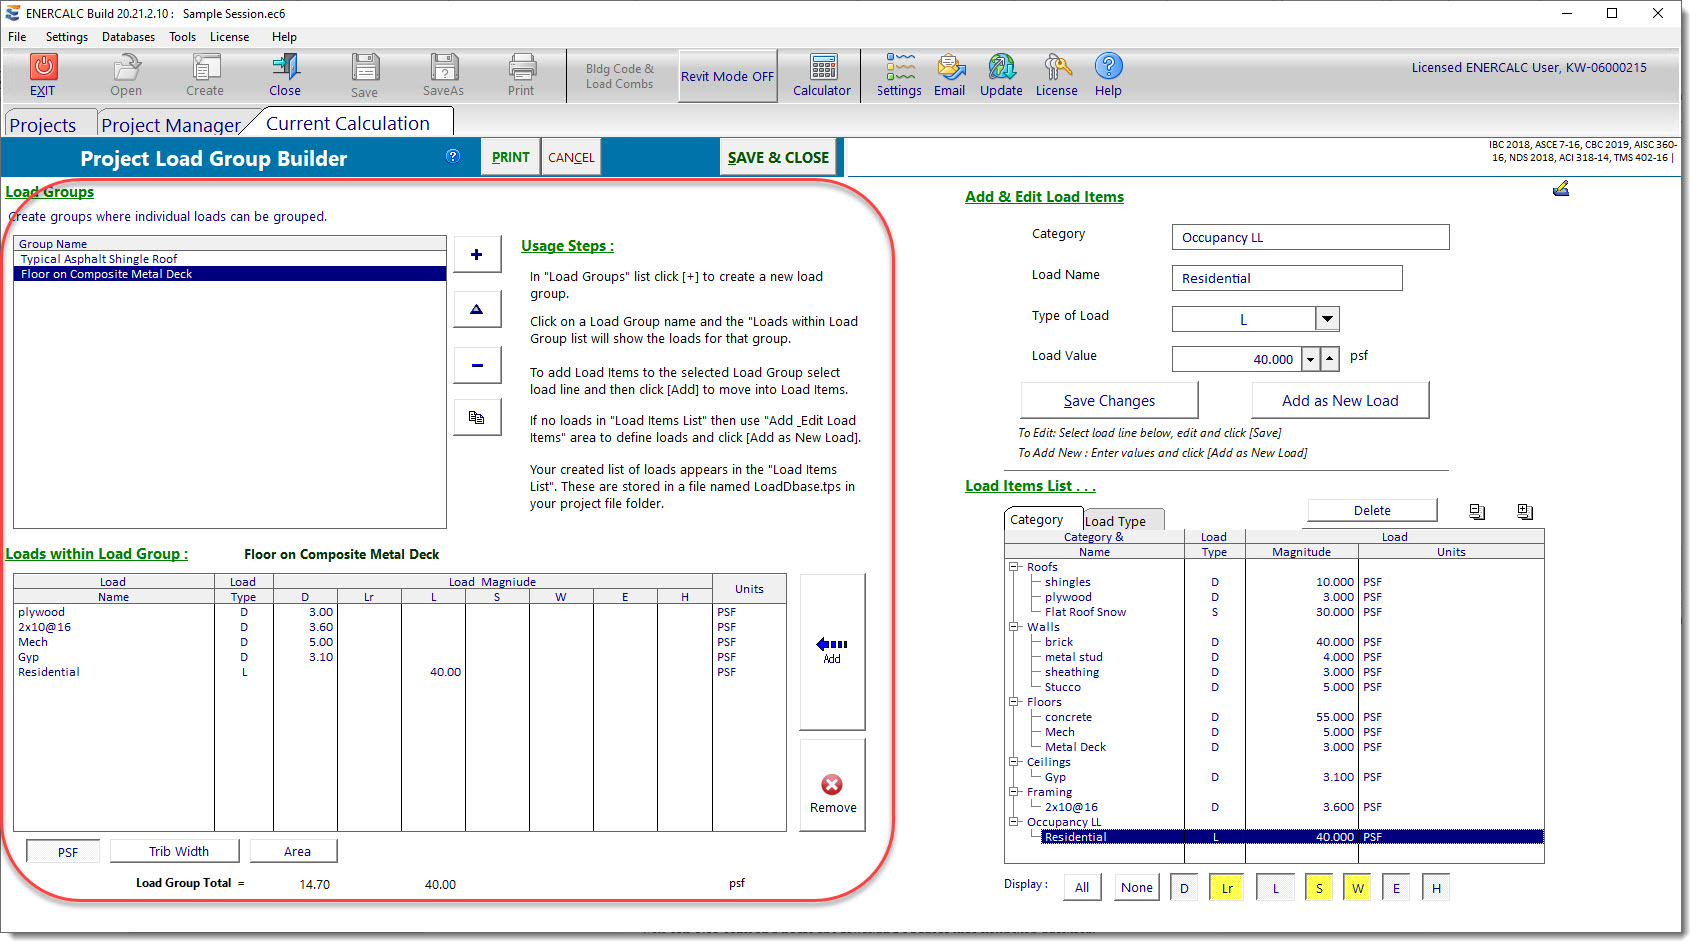
The Load Groups in the current Project File are listed in the "Group Name" list in the upper left corner of the module. The toolbar buttons above the list perform the following functions:
![]() Adds a new Load Group
Adds a new Load Group
![]() Creates a copy of the selected Load Group
Creates a copy of the selected Load Group
![]() Allows the name of the selected Load Group to be edited
Allows the name of the selected Load Group to be edited
![]() Deletes the selected Load Group
Deletes the selected Load Group
When a Load Group is selected in the "Group Name" list, the details of that Load Group are displayed in the lower left corner of the screen. (A newly created Load Group will display no detailed information until some Load Items are added to the Loaf Group.) The display will show the Load Items that have been added to the current Load Group including the Load Item name, the Load Type (Dead Live, Snow, etc.), the magnitude of the load, and the units.
So we have now covered Load Items and Load Groups. The final detail is...how do we add these Load Items to Load Groups? The answer lies in the buttons shown below:
 Adds the selected Load Item to the current Load Group
 Removes the selected Load Item from the current Load Group
Finally, the Print function will automatically include all defined Load Groups and provide a nice tabular summary of the Load Items that combine to produce each Load Group.
 <
<